Tuesday, December 23, 2014

Good News To Report

The cable swivels arrived in the mail yesterday afternoon.  I went out to the hangar this morning and installed them.  
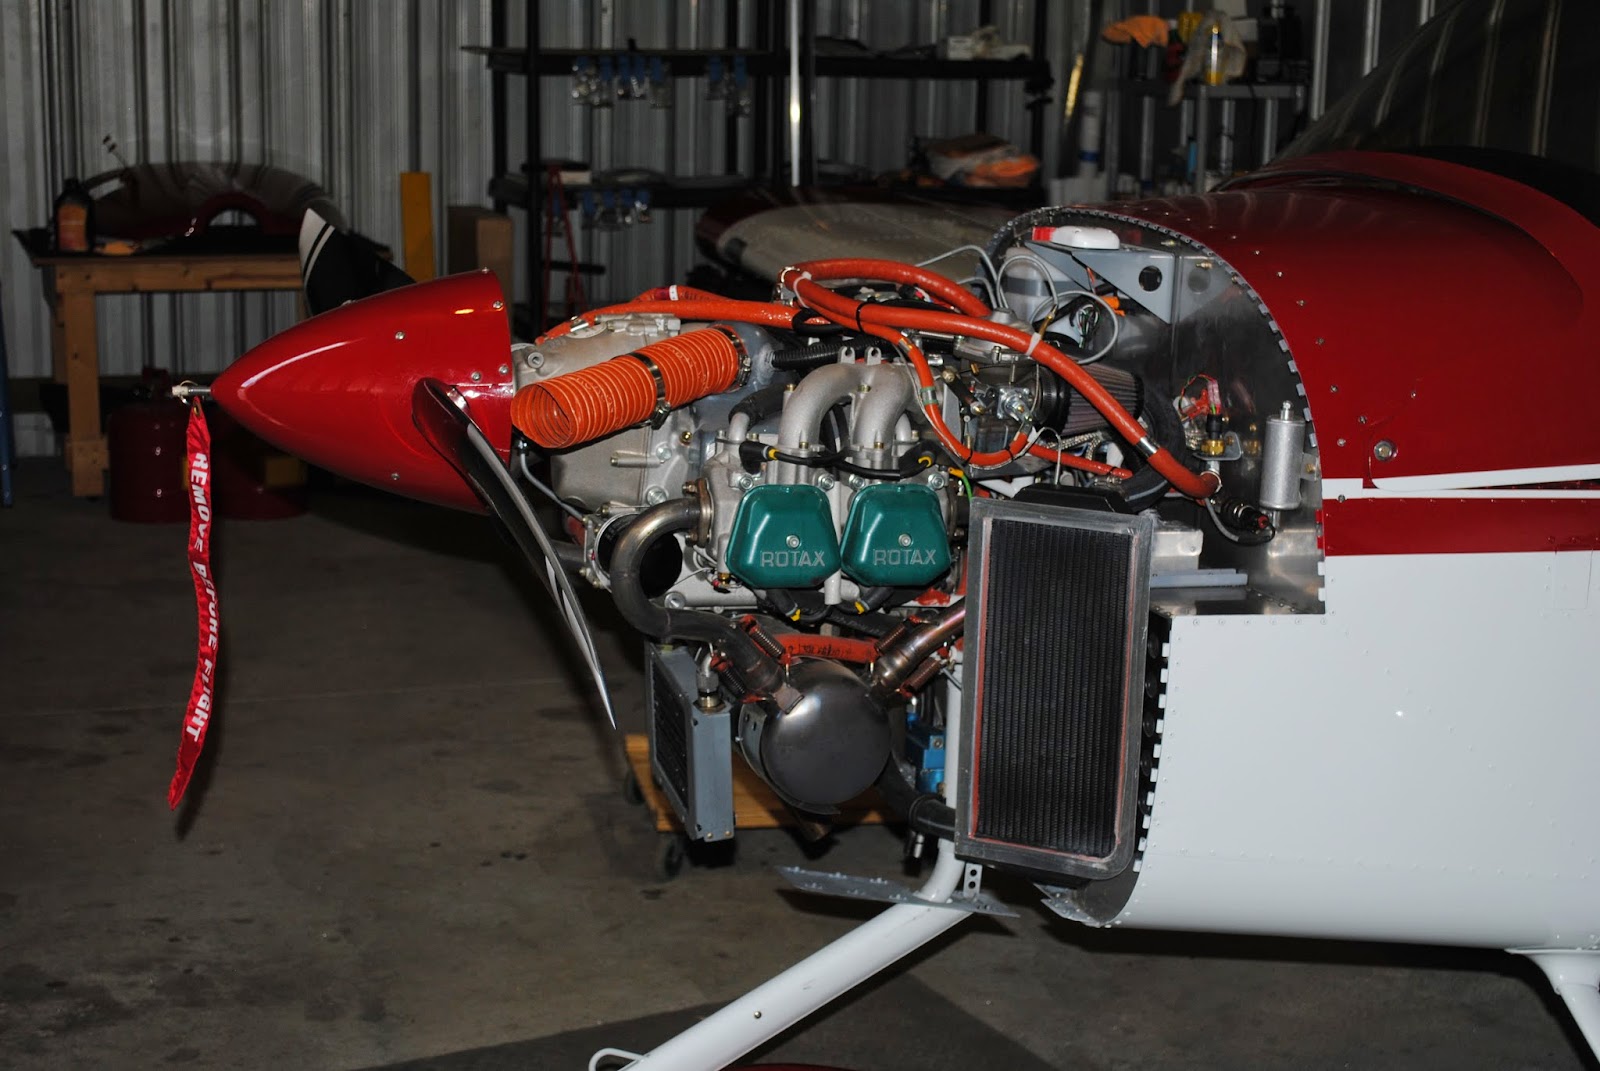
The control arm on the oil shutter was thin enough that the swivel installed with only drilling a hole.  I cut the control wire to the right length and installed the swivel.  I have the controls arranged so with the control knobs pushed all of the way in the oil shutter and duct damper door are open.  
Pulling the 'OIL' control knob less than an inch closes the shutter.  I then installed the swivel on the air duct damper.  It took a little more work.  The material I used for the control arm was too thick to allow the swivel to turn.  I removed the arm and put it in my bench vise.  I used my Vixon file to reduce the tickness of a section of the control arm.  I deburred the arm with my Scotch Brite wheel and drilled a hole.   I reinstalled the arm and installed the swivel.  By pulling the 'AIR' control knob about 1-3/4” it closes the damper door.  I reinstalled the top cowling and finished installing the screws on the lower cowling.  I then pulled the  airplane out of the hangar and went up for a test flight.  To my joy and satisfaction as soon as I started the engine and closed the oil shutter the oil temp began to rise.  I finished buckling in and started to taxi to the end of the runway.  To my amazement, by the time I arrived at the end of runway 34 the oil temp was at 124o.  It started at 40o.  About half way to the runway I closed the air duct damper door.  I think that also helped to raise the oil temperature.  I took off and flew for 0.8 hours.  With minor adjustments to the shutter and damper door the oil and head temperatures were right where they should be.  The OAT was -2o C.  I am pleased with the results.

Monday, December 22, 2014

Oil Shutter and Radiator Damper

This morning I went to the hangar and worked on the oil shutter and radiator damper modification.  I started by shortening the top pivot shaft on the damper door.  I also reduced the length of the arm on the damper control.  I then fabricated a mounting angle for the controls.  I painted the angle black and mounted it below the master switch module under the instrument shelf.  
I also drilled two holes in the firewall next to the brake fluid resivour and installed some grommets for the control cables to pass through.  I installed the lower cowl and determined a path for a section of 3/8” tubing to pass through in the cooling duct.  I installed the duct with Adel clamps.  I also installed a section of tubing through the firewall for the radiator shutter control to pass through.  I installed the tubing and the control cables. 

I also labeled the control knobs.  With the controls pushed in the oil shutter and radiator damper and both open.  By pulling the control knobs the shutter and damper close.  I put some high temp red RVT over the grommets and controls cables where they penetrate the firewall.  I will install the control wire swivel connections tomorrow if they come in the mail today.

Friday, December 19, 2014

Work on Radiator Shutter

I continued to work on the radiator shutter.  Using the pattern I cut out the shutter.  I also made the pivots out of some 3/8” aluminum rod.  I made the actuator arm for the top pivot from some flat aluminum.  I marked where the pivots are to go on the top and bottom of the shutter.  I also drilled for the screws on the lower pivot.

I marked and drilled the location of the holes on the top and bottom of the duct.  I fabricated some aluminum washers using a hole saw and drilled the center to 7/16” then riveted the bottom washer to the floor of the duct.  I installed the upper washer to the top of the duct and installed the shutter.  I am satisfied with the way it fits and turns in the duct.
I broke the actuator arm so I fabricated a new arm from a piece of aluminum angle and a piece of aluminum flat bar.  I drilled the angle and bar and riveted them together.  I drilled a hole in the angle and bolted it to the upper pivot.  I will cut the actuator arm to length and drill the hole for the cable swivel after the swivels arrive from Wicks Aircraft Supply.  With the arm in place the shutter opens and closes just fine.

I also took the shutter to 3D Sheet Metal and had them put a break from the top to the bottom pivot points.  The shutter is now much stronger.  Before breaking the shutter I was afraid the air blowing through the duct would bend and deform the shutter.  I also installed stops (angle) to control the open and closed positions of the shutter. I will work on the control cables next week.

Wednesday, December 17, 2014

Oil Cooler and Radiator Dampers

Yesterday and today I have been working on the design and fabrication of a shutter type device for the oil cooler and radiator.  With the cold weather it takes a much longer time to heat the engine.  The engine oil temperature has to be 122o before I can run the engine above 2400 RPMs.  During the warmer months I could start the engine and taxi out to the runway while it was warming up.  It would be warm enough to operate by the time I got to the run-up area.  Now if I taxi out to the run-up area I have to sit and wait for 10-15 minutes before I can run-up the engine to check the ignition.  In the form several builders have done these mods and they say it makes a whole lot of difference in cold weather.  
I started yesterday by removing the upper and lower cowlings.  I then began fabricating a shutter for the oil cooler.  It consists of an aluminum plate with guides riveted to the top and bottom edges.  I have drilled holes for the cooler attachment bolts and holes for the oil cooler bolts that remain in place on the lower cowling. 
I cut a door to fit in the guides and then laid out lines for cutting the openings.  When the shutter is pushed to one side there are 7-slots that allow air to pass through the oil cooler.  When it is pulled the other way it closes the openings.  It is not airtight so there will always be some air going through the oil cooler, but very little so the oil will warm more quickly.  I laid out the lines last night and today I drilled and cut the openings.
Next I filled and deburred the openings.  I cut out a ‘T’ shaped  actuator  and a connection arm.  I made modifications to the shutter door so I can mount the actuator to the base plate.  I drilled holes in the arm and a the actuator and connected them to the shutter door.  I then assembled the mechanism.  
By putting a rivet in the edge of the base plate and installing the actuator arm the shutter door is limited in how far it can slide in both directions.  I will connect it to a push pull cable the will be attached under the instrument shelf in the cockpit. 
I tried putting it in place in the front of the cowling over the opening for the oil cooler.  It appears to work great.  I will need to determine where and how I will run the control cable.  I think I will attach a section of tubing inside of the cowl duct to run the control cable through.  That way when I remove and reinstall the lower cowling I can push and/or pull the cable through the tubing and then connect the end to the actuator arm.  I ordered some control cable swivels from Wicks Aircraft Supply.  They should be here the first of next week.  However, with Christmas, who knows when they will get here.

I then turned my attention to the radiator shutter.  It will be an aluminum door inside of the duct in front of the radiator.  I cut a piece of mat board the shape of the door.  I will need to get some hardware, tubing, angles, etc. so I can continue with the installation.

I will continue to work on the radiator damper tomorrow.

Friday, December 5, 2014

Tach and Transponder

This morning I went to Standard Electronics in Salt Lake City and purchased a 30K Ohm resistor.  I went to the airport and installed the resistor in the tach input line from the Rotax.  It took about 30 minutes to remove the top cowling, install the resistor and replace the top cowling over the engine.  I loaded my 5-gallon gas cans and purchased 10 gals of fuel.  I fueled the airplane then went up flying to check out the transponder and the tach.  I stayed in the pattern and made 4 touch-and-goes and one full stop landing.  The transponder switches between GND and ALT just like it is supposed to.  I also get a traffic warning on the PFD and targets with vector arrows are displayed on the moving map.  This is very cool.  The tach is no longer jumpy.  It is rock solid when the RPMs are above 4800.  It has been a good day.

Thursday, December 4, 2014

AOA Calibration

I discovered as I landed on my last flight that the AOA widget was no on the instrument screen.  It was located next to the speed tape but is no longer there.  I have determined that when I uploaded the file from Van’s it removed the AOA readout.  I went up today to recalibrate the AOA.  To do so you must do at least 1-stall (preferably more than one).  I flew out over the evaporation ponds and turned south.  I climbed to 7200’ and set up for a fast cruse.  After oscillation the airplane per the instructions on the calibration screen I performed a ‘clean’ stall.  I then proceeded to perform a ½ flap stall and then a full flap stall.  I saved the data and the AOA is once again visible and calibrated.  I also discovered my transponder was not transmitting.  A guard helicopter pilot told me I was not showing up on his instruments or on the Salt Lake tower instruments.  I realized that the transponder still had STBY in the display.  It was on standby.  I went into the transponder menu and hit ALT.  The transponder came to life and began transmitting my altitude and also began receiving information from other aircraft transponders.  When I got back on the ground and to the hangar I did some research.  It turned out that my transponder software needed to be upgraded.  I proceeded to do so and then went into the setup menu and selected AUTO GND/ALT.  It is now supposed to automatically switch between ground and altitude. I will check that out tomorrow.  Also, for the past couple of flights the tach is jumping around at 4800 RPMs and higher.  I keep getting a yellow warning and the RPMs are over 5500.  I did some research and have found this problem is not new.  Others have installed a 30K Ohm resister in the line from the engine and it has solved the problem.  I will get a resistor and install it tomorrow and see what happens.

Monday, December 1, 2014

Another AP Checkout Flight

I went up again today for a short flight to check out a couple of things in regards to the AP.  I made one small adjustment to the VSI gain and I am now satisfied with the way the AP captures and holds the altitude input.  The weather was a little strange.  When I took off the winds were calm and visibility was 10 miles.  I flew out to the evaporation ponds north of Grantsville to check out the AP.  As I neared the water towers south of ATK the air got really rough.  There was lots of turbulence.  I climbed to 6200’ and continued flying towards Magna.  When I got past Magna, but not quite to Saltair a low lying cloud cluster was right in my flight path.  I entered the cloud and was through the other side in a matter of seconds.  It was an interesting experience.  After flying for a short time I returned to the airport.  The wind was now 160 at 14 knots , gusting to 19 knots.  I was happy to put it down for the day. I also noticed when I landed that my AOA widget is missing from the PFD.  It appears that when I updated the SkyView with the Vans download the AOA was deleted.  I will need to go up again and recalibrate the AOA.

Thursday, November 27, 2014

Success With The AP

I went out this morning and made some changes to the roll axis settings in the AP set-up.  I changed the roll sensitivity value from 22 to 5.  I changed the roll gain value from 2.4 to 1.5.  Success!!  I took off and flew south and then east over Sandy and Draper.  After reaching an altitude of 5800’ I engaged the AP in TRAK+ALT.  It flew and maintained the course and there was no ROLL SLIP message,  Hurray!!  I flew for 0.6 hours and it worked perfectly.  I am very pleased with the performance.

Wednesday, November 26, 2014

Flight Tune Auto Pilot

Today I went flying to ‘flight tune’ the AP.  Since downloading and installing the Version 11 SkyView update from Vans along with the AP presets on the Vans download site I have been having an AP problem.  When I engage the AP I get a ROLL SLIP message.  Normally that means the servo does not have enough force to control the flaperons.  It only occurs when I am flying straight and level.  That is when the least amount of force is required.  When in a turn the roll servo functions correctly, but when the airplane rolls out of the turn and returns to straight and level flight the ROLL SLIP message returns.  It is only displayed momentarily then goes out, only to return for a few seconds over and over again.  I went through the AP ‘flight tune’ process and it turns, climbs or descends and holds  altitude but I continually get the ROLL SLIP message when AP is on and I have selected TRK+ALT or HSI+ALT.  I have checked on the Dynon Forum and I think I will return to the airport and adjust the roll axis settings.  I am going to reduce the roll sensitivity and see if that takes care of it.  Right now the sensitivity is set at 20+.  I will reduce it to 5 and see what happens.  If that does not correct the problem I will take some screen shots of the settings and of the ROLL SLIP message screen and send them to Dynon.  While flying today out over the west desert I took some photos as I neared the Salt Flats.

Friday, November 21, 2014

Reinstalled Control Module

Today I reinstalled the control module (AV5000) and reinstalled the upper fuselage skin.  I pulled the airplane out onto the apron.  I went into the menu on the SL-40 and adjusted the value of the sidetone to 100.  It was originally at 0.  The highest value to which it can be set is 255.  There was no change to the whine in the headset.  At 4:00 pm Arlene and I went up flying for almost an hour.  It was a good time.  We flew over Sandy and Draper, over the Sun Crest area and into Utah Valley.  We went out over Utah Lake then turned and came back to the Salt Lake Valley.  I turned on the auto-pilot to see how it functions with the newly installed AP presets from Vans.  I am going to need to spend some time in the air “re-tuning” the AP.  It is pretty twitchy in the turns and it wanders a bit on the altitude hold.  Otherwise we had a great time.  This is the first time Arlene has flown with me since the time she went up following the 5 hour flyoff.

Monday, November 17, 2014

Answer From Vans

I received an email from Ken Scott.  He says the serial number on the AV5000 indicates it is well outside of the range of problem units.  Ken says the whine is not a problem with the control module. 

That is not good news.  He also said one of the other techs said it could be the sidetone on the SL-40.  If the sidetone value is too low the mic will pick-up the engine sound in the cockpit and cause a whine.  I will go to the airport and try increasing the sidetone on the radio to see if that helps.

Friday, November 14, 2014

Radio Whine Problems Explored

For the past couple of months I have had a problem with a whine on the radio.  It became more apparent over the last few weeks as I have attempted to play music over the intercom.  I have contacted Vans in the past with little response.  Yesterday I sent the following to Vans Tech Support:

Date sent:           Wed, 12 Nov 2014 10:41:57 -0700
Subject:               Radio Whine

I have a whine on the pilot and co-pilot headsets.  I am using
Lightspeed Sierra ANR headsets for both.  The whine becomes worse with increased RPMs.

If I turn the volume down on the headsets so the whine is not
bothersome and I turn up the volume on the radio (Garmin SL-40) I can
hear radio communications.  However, at that point I cannot hear the
SkyView annunciations.  If I turn the volume up on the headsets to
hear the SkyView announcements the whine is back. 

I have checked the ground on the headsets, the ground on the radio and
the ground on the engine to the airframe.  All are good.  I have even
added a wire connecting the intercom case, the radio case and the
SkyView case as suggested on a Dynon forum.  Nothing so far has
worked.  Do you have any suggestions as to how to increase volume on
the SkyView or eliminate the whine altogether?

Thanks for your help,

Sam Jespersen
120347
N419AJ

Ken Scott responded with:

This may be the result of a known problem...but we'll need the serial number on your AV5000 "box" to know for sure...


Today I went to the hangar and started to take the airplane apart one more time.  I removed the upper fuselage skin.  I have discovered I can remove the skin without completely removing the canopy.  That is a good thing.  I removed the AV5000A and recorded the serial number.  I also took a photo of the label and sent it to Ken.  I am waiting for a reply.  I left the upper fuselage cover off for now and covered the area with plastic.  With the cold weather it is possible to have some interior condensation rain and I would hate for some moisture to get into the instrument area.

Monday, September 29, 2014

Short Flight Over Herriman

Today was another first.  Arlene’s brother, Allen and his wife Shirleen came for a visit.  We drove to the airport and I took Allen up for a short flight.  We did a touch and go and then flew out over Herriman to the south.  I was very pleased with the performance of the RV-12.   This is the first time I have had a full grown man in the passenger seat.  Allen and I are about the same size and I had 17 gallons of fuel on board.  That made us pretty close to gross weight.  The RV-12 flew exceptionally well.  We had a great time.  After the flight Arlene took our picture.  Then Arlene and Shirleen climbed in and I took their picture.

Friday, September 26, 2014

Short Flight On A Windy Day


I was able to go up for a short flight this morning.  My schedule for the last few days has made it impossible to go out to the airport.  Today I have the time but the winds are starting to pick-up in front of a coming storm.  I dropped Tim (my grandson) off at work and headed to the airport.  It was about 8:30 am when I got into the air.  I was afraid the wind was going to start increasing so I stayed in the pattern.  I flew for nearly an hour working on take-offs and landings.  Upwind from runway 16 is a corn maze the farmer does each year.  Today I extended my upwind and took a picture. The kids in the area really like to go there in the evenings.  They come from all around the valley. 
After doing 6 touch and goes I put the airplane back in the hangar.  I went down to the local gas station and purchased some gas, returned to the hangar and fueled the airplane.  I am ready to go up again when the weather permits.

Tuesday, September 16, 2014

Two Days of Flying

Yesterday and today I went up for 2+ hours each day.  Yesterday I took off from South Valley Regional and did 3-touch-and-goes.  I then flew to the Tooele valley and did 2-more touch-and-goes at the Tooele airport.  From there I flew south over the city and into the Cedar Valley.  I flew to the south side of the valley and there I calibrated the AOA (angle of attack).  To do so I needed to establish a fast cruise and then fly some +5 deg /-5 deg maneuvers to give the AOA a base line.  I then performed 3-different stalls.  The first stall was clean, no flaps.  The second was a stall with 1 notch of flaps.  The third stall was full flaps.  After completing each stall I pushed the “stall” button on the SkyView.  I now have the AOA widget on the PFD next to the airspeed tape.  It is really great to see that I have sufficient lift to fly.  Or in other words, I am not exceeding the angle of attack. 
Today I flew down to Delta.  I used the autopilot.  I entered a very small flight plan with 2-waypoints.  The first was the Nephi airport and the second was the Delta airport.  I turned on the autopilot and activated the flight plan (HSI & ALT).  The airplane performed flawlessly.  After reaching Delta I switched to altitude and heading hold (TRK & ALT).  I flew down to Holden, over to Scipio and back up through Nephi and back to South Valley Regional.  What a fun time I had.  I took a picture of Cedar Valley over Fairfield Peak.

Thursday, September 11, 2014

More Touch-and-Goes

Today I had a few minutes of open time.  Who said being retired was going to be a walk in the park. Like I have heard so many before me say, now that I am retired I don’t know how I had time to go to work.  This is crazy.  I stopped and purchased 10 gals of fuel on my way to the airport.  I fueled the airplane and because of time limitations I was only able to fly for 0.7 hours.  I stayed in the pattern and did 6-more touch-and-goes. The pattern was pretty quiet this morning.  Only one other airplane took off and started some pattern work as I was finishing up.  I had a great though short time.   This is a sweet little airplane to fly.

Wednesday, September 10, 2014

Did 6-Touch-and-Goes

I went out to the airport early this morning.  I pulled the airplane out onto the apron and did a pre-flight.  Everything was in order.  I got in, started the engine and allowed the oil temperature to come up.  The oil pressure was fine, the servos connected and all was good.  After the oil temperature was up I taxied out to the run-up area for runway 16.  There was a helicopter doing closed pattern work and mine was the only other aircraft entering the pattern.  I took off and it was wonderful to be in the air again.  Because of time restraints I could only do some touch-and-goes.   There was a slight cross wind.  The wind was 220 at 6.  After the touch-and-goes I taxied back to the hangar and put the airplane away.
I have only 6 –gallons of gas in the tank so I loaded up my fuel cans.  I will buy some fuel on my next trip out.

Tuesday, September 9, 2014

Reinstall Roll Servo

I received the roll servo from Dynon yesterday.  The packing slip says they corrected the problem and waived the repair fee because the servo is still under warranty.  They did not indicate the nature of the problem, only that it had been fixed.  I went to the hangar and reinstalled the servo.  It seems that there is always something that causes a simple procedure to become complicated.  The first thing I did was make the electrical connections.  After making sure the connections were good I proceeded to install the servo and the flaperon pushrod.   While attempting to install the servo I dropped the bolt and washer used to attach the flaperon pushrod to the roll servo arm.  Of course I was in the baggage compartment and had to exit the airplane to get a light and magnet so I could retrieve the bolt from under the baggage compartment.  What fun we have when trying to complete a fairly simple task.  I was finally able to install the servo and install the pushrod successfully.  At that point I turned on the SkyView.  As it was booting up it found the servo and installed some updated software.  I ran the servo test and calibration.  It seems all is well.  
I reinstalled the covers, plates, upholstery, seats, etc.  I also installed the top fuselage skin and upper cowling.  Of course that did not go without a hitch.  While installing the 100+ screws I ended up using my 8/32 tap to fix the threads on several nutplates to keep from stripping out the heads of the screws.  One of the nutplates was under the left canopy attachment arm so I was forced to remove the canopy.  All in all, I was able to get everything reinstalled and tightened so the airplane is now ready to fly.  The oil pressure problem has been repaired and the roll servo is now back on line.  I would have flown today but the weather was pretty bad at that point.  Severe rain at the airport with lots of thunder showers in the vicinity.  I will return to the airport and do some touch and goes tomorrow morning.