Friday, November 22, 2013

SkyView / SL-40 Com Radio and Self Fueling

Yesterday I received several items I have ordered in the last week.  I received 2 each 5-gallon metal gas cans, a filter funnel and a grounding cable with a clamp on each end.  I will need these as to fuel the airplane.  I will be working with the Salt Lake Department of Airports to become certified.  Until I am certified and show that I have the proper equipment I cannot do any fueling.
I also received the part (wire) to connect the SkyView to the SL-40 Com Radio.  By installing this wire I will be able to put frequencies looked up in the SkyView airport data base directly into the SL-40 Com Radio.  That means upon looking up a frequency I can push a button and it will be tuned into the SL-40 standby.  Then by pushing the switch button the new frequency will be ready to use.  I put the end of the wire in the D-Sub connector on the AV5000A control module.  
I ran it along the wire bundle over to the SL-40 and put wire ties along the way.  I used a mirror to put the pin in the connector on the SL-40 radio tray.  It all went really slick.
It was a tight fit for big fingers but I was finally able to remove the screw holding the original ground wire and slip the new ground wire ring inplace and reinstall the screw.  It is really cold today so I didn't stay long at the hangar.

Thursday, November 21, 2013

Fuel Pump Switch

My plan is to install an on-off switch to in the fuel pump circuit so I can turn the electric fuel pump off when I am updating the SkyView and need the electrical system activated.  Or at other times it might be nice to be able to turn off the pump without pulling the fuse.  Yesterday I emailed OTTTO Manufacturing to ask which switch I should order.  Their sales rep for this area called and said OTTO does not sell individual switches.  He also told me he was coming to Salt Lake City on the 21st.  He said he had a meeting in Spanish Fork.  Of course you go through Pleasant Grove, where my office is located, on your way to Spanish Fork.  He also told me if he happens to have a switch in his sample kit he would drop one off for me.  What a deal.  He called a little later to tell me he has a switch and will drop it off.  I now have the switch.  I took it to the hangar and using some test leads hooked it up to a 12V battery and a test light.  There are 4-terminals on the back of the switch.


After trying several different wiring configurations I finally found how to hook it up so in the on position the test light glows and the green indicator light on the switch glows.  When switched off both light go out.

Wednesday, November 20, 2013

Brake Fluid

Today I filled the brake lines with fluid.  I purchased the fluid several months ago.  Yesterday I purchased some ¼" plastic tubing from Home Depot.  I cut of a 2' piece of tubing and inserted it over the end of the spout on my oil pump can.  I filled the can with fluid, opened the bleeder valve on the brake and attached the tube.  I pumped fluid into the right brake system until it filled the reservoir ½ full.  

I removed the tubing and closed the bleeder.  I attached the tubing to the right brake caliper bleeder valve and pumped fluid into the right brake lines until the reservoir was nearly full.  I closed the bleeder and removed the tubing.  I checked the brakes.  There seems to be good pressure on both pedals on both sides.  It appears to be a success.  The lines are all pink.

Tuesday, November 19, 2013

Gather Documentation

I contacted Van's about the data wire between the SkyView and the SL-40 COM radio.  I am able to order the wire as a part from Van's.  
I placed and order and the wire should be here by the end of the week.  I ordered some spare fuses from Van's.  They arrived today so I brought them to the hangar. 

I have been gathering documentation in preparation for the completion of the build and the DAR inspection.  I down loaded the Brake Installation Manual from MATCO Manufacturing.  I printed it and had it bound.  I have printed and bound the Rotax Installation Manual and the Rotax Maintenance Manual.  I also had the Rotax Operators Manual bound.  I printed the SkyView Installation Guide and the SkyView Installation Manual and the SkyView User Guide both version 7, the current version of the software.  I put the SkyView manuals in loose leaf notebooks.  There is considerable documentation to gather and maintain.  
I also found a case of Dremel Tool attachements in the shop at home so I brought them to the hangar too.

Monday, November 18, 2013

More Miscellaneous Stuff

Friday evening I went to the EEA Chapter meeting.  We toured the Boeing facility at the airport.  It was a lot of fun.  Tom Driscoll was there and I asked him some questions about his RV-12.  He now has 25 hours on the hobbs meter.  He told me about an optional data wire that connects the SkyView and com radio.  With the wire installed you can put frequencies into the radio from the SkyView airport screen. He says it is pretty cool.  I decided to install the wire.  At the airport today I looked to see if the wire is already in the harness.  It is not.  I will order one from Vans' this evening.
I also decided to install a bolt holding fixture to the bottom of the fuel tank. Several builders have reported that when installing the fuel return line to the bottom of the tank they have broken the seal on the fitting, causing a leak under the tank.  First I removed the tank from the fuselage.  Next I cut out a piece of 1/8th thickness aluminum to use for the hold fixture.  I laid out a hole the size and shape of the fuel fitting then using a drill and file I made the hexagonal opening to hold the fitting.
I think it turned out well and fits the fitting just right.  I mixed some Pro-Seal and lathered the bottom of the fixture then placed it on the bottom of the tank over the fuel fitting.
 I put some Pro-seal around the fitting to help hold everything together.  The size of the plate and the thick layer of Pro-seal should do the trick.

Tuesday, November 12, 2013

Electrical Trouble Shooting

Gus confirmed that I need to switch the pins.  I switched the pins in the option connector and viola everything works just as it is supposed to.    
The NAV switch turns on the nav lights, the AP disconnect  and the cockpit light.  The NAV/STROBE switch turns on the nav lights, the strobe lights, the AP disconnect and the cockpit light.   I am happy to have that problem solved.  
Having been able to put that problem to bed I decided to install the new Molex micro connectors at the trim servo tray.  I had cut the connectors off when the trim motor would not function.  I didn't like the way I had initially installed the micro connectors anyway so I am glad to replace the whole Molex connection.  
I drew a small diagram showing where the various wires are to be installed in the new connector body.  I taped the sketch to the fuselage and proceeded to strip the wires coming from the servo tray.  I carefully crimped the connectors on the wires and the carefully inserted them into the Molex connector.  I was able to get them oriented correctly and they locked in place without too much effort.  
Because there are 2-pair of white wires I decided to mark one of the pairs with some black electrical tape to identify them.  I stripped the wires and crimped on the micro connectors.  I inserted the connectors in to the Molex connector.  I guess I was finally able to do something right.  The AST trim servo works perfectly at this point.

Monday, November 11, 2013

Electrical Trouble Shooting Continues

Today I hooked up my test lights.  I have 2-lights on each side of the cockpit hooked up to the wing root connectors.  To make this work I purchased 2-more lights and some new test leads.  With the new test leads I was able to get the connections to work.  Once again I have wing tip lighting.  It is still not correct but I do have power at the root connectors.  
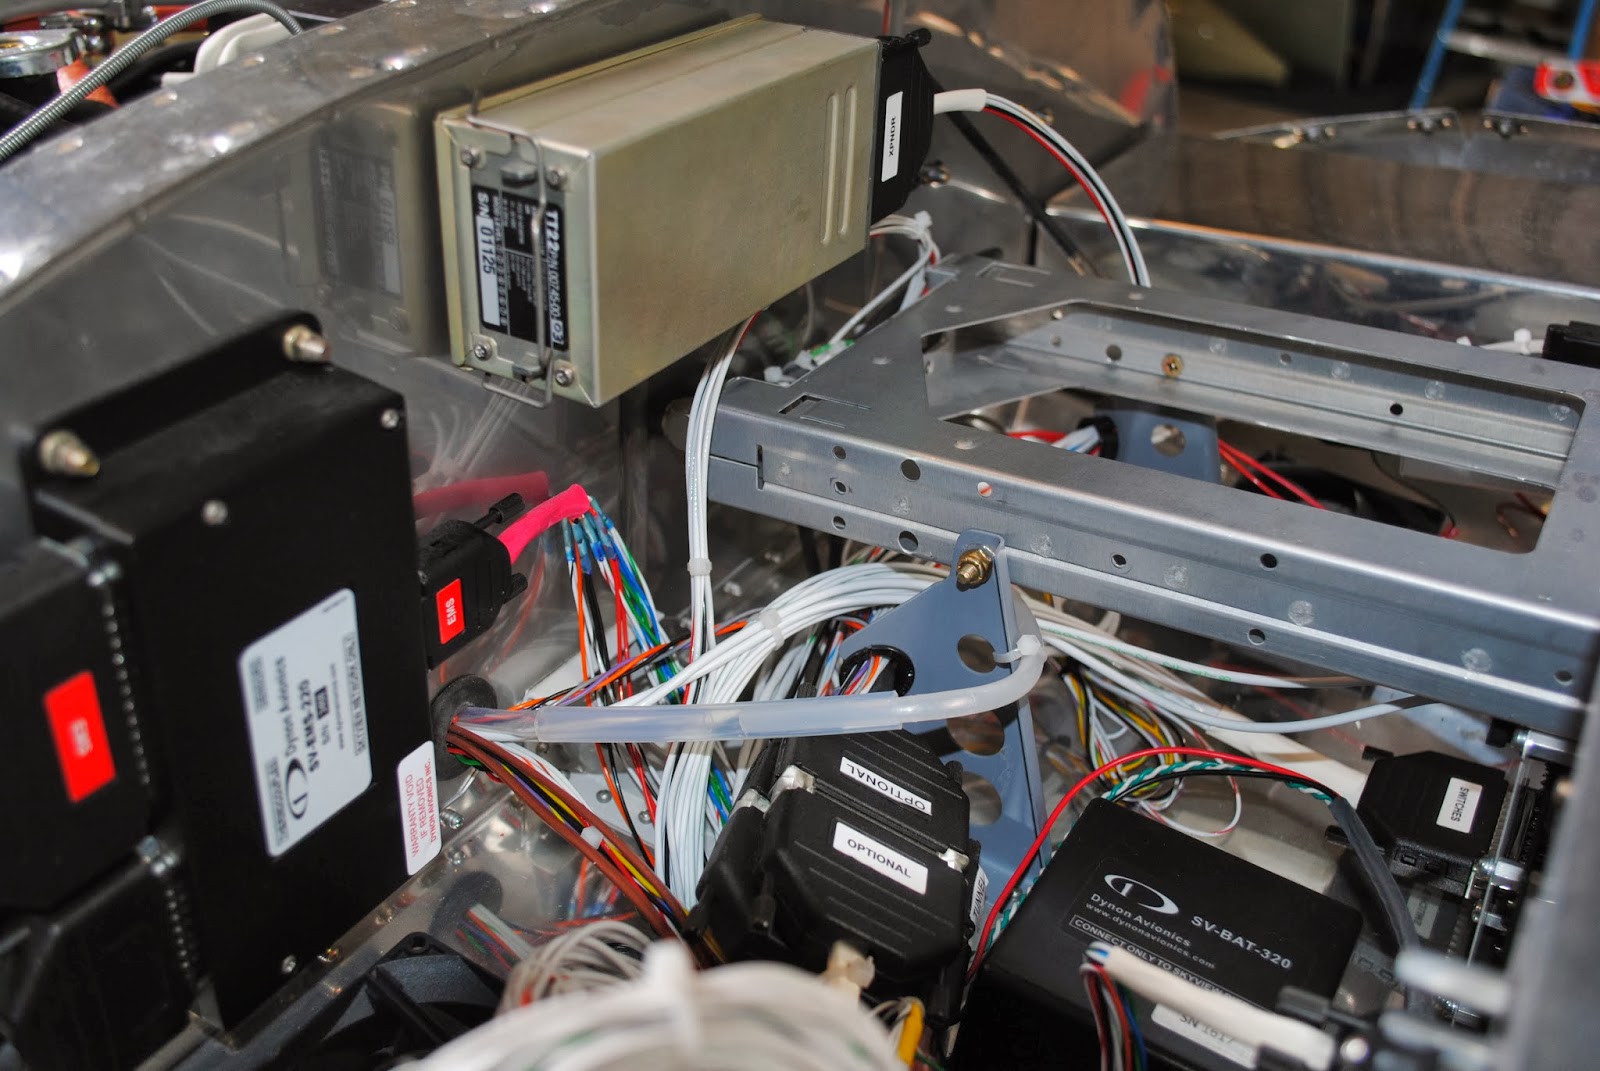
When I turn on the NAV/STROBE switch I have the nav lights, strobe lights, cockpit light and AP disconnect light.  When I turn on the NAV switch I have the strobe lights only.  No cockpit and no AP Disconnect.  When I spoke with Gus last Friday he told me he would check the Factory Demo RV-12 and see if the cockpit and AP disconnect lights come on with the NAV switch.  He called me on my way home from the hangar to tell me they did.  He also thought there might be a possibility that there is a problem with the wiring from the control module to the switch module.  The electrical drawings shows pin 14 (Nav Power) on the control module goes to pin 9 (Nav) on the switch module.  Also, pin 1 (Strobe Power) on the control module goes to pin 7 (Strobe) on the switch module.  I did a continuity test and found them reversed.  In reality, pin 14 on the control module goes to pin 7 on the switch module and pin 1 on the control module goes to pin 9 on the switch module.  I have emailed Gus to see if he suggests changing the pins.  I don't want to do anything that will cause additional problems.  I have also asked if he thinks changing the pins will remedy the cockpit and AP disconnect light problems.  I'll wait for his email before doing anything.
While at the airport I used my newly fabricated prop fixture to see if the blades are truly 1o off from each other.  I clamped the fixture with the electronic level to one blade.  I rotated the prop and attached the fixture and level to the other blade.  The blades are 1o off from being the same.  I will tackle adjusting the propeller another day.

Friday, November 8, 2013

Electrical Trouble Shooting Continued

Today I continued to chase the electrical problems.  I traced wiring all over the place. 
I removed the wing root wiring connections and checked the wires going to each connector.  I discovered I had the 5,6,7,8 pins reversed on the right wing connector.  I removed and reinserted the pins.  At that point I had power to the landing light – both steady and pulse.  I also learned that I had power to the wing tips, sort-of.  When I depressed the NAV/STROBE switch the Nav light had power, the Strobe had power, the AP Disconnect button illuminated and the cockpit light illuminated.  When I turned the switch off everything went dark.  When I turned on the NAV switch I had power to the strobe lights only.  Still no cockpit light and no AP disconnect illumination.  I called Van’s and spoke with Gus Funnell.  We both thought it strange that I was able to establish continuity from the pins on the option harness at the control module to the wing roots, but the NAV switch does not make the things come on correctly.  Because the strobes come on with the NAV switch we thought maybe the 33 & 34 pins might be switched in the harness. The 33 pin is power to the Nav lights and pin 34 is power to the strobes.  I pulled the options connector from the control module and switched the pins.  That was not the thing to do.  I lost most of the power to the wings I had.  No cockpit and no AP disconnect.  I switched the pins back and now I am having trouble getting the wing top lighting to work.  I stopped for the day.  I will try again on Monday.

Tuesday, November 5, 2013

Propeller Fixture

Today I made a propeller fixture similar to the one made by Tony Tesstitorie's.  I made it out of some scrap aluminum angle I had at home.  I taped it to my electronic level and discovered the blades are 1.1o out of being equally set.  I will work on getting them as close to the same angle as possible in the very near future.
 

I also emailed Gus at Van's with the information from my post yesterday.  He suggested I make certain the power to the nav lights is going from pin 33 on the optional connector to pin 6 in the wing connection.  If that is the case the problem is not swapped pins.

Friday, November 1, 2013

Adjust Potentiometers and Trouble Shoot Electrical

Today I continued to work on the electrical challenges.  I removed the master switch module from the instrument panel so I could get to the trim tab pot.  I also removed the SkyView  screen. 
I discovered that the major problem with the trim tab was the pot was turned completely off.  Yesterday I turned the trim pot clock wise but nothing happened.  Today I turned it CCW and viola, it works.  By turning the pot CCW I was able to get the trim to function properly.  It now moves up and down and the travel time is 25 seconds.  After working on the potentiometers for a while I decided to cut the pot adjusting tool in half so I could more easily get to the adjustment screws.  It worked well.  With only half the tool length I was able to do the adjustments on the side of the Control Module. Next I decided to work on the sound.  I plugged in an MP3 player and put some musing into the system.  I plugged in the pilot headset.  I had the volume on the head set maxed and the volume on the MP3 player maxed.  After turning the Aux 1(L) and Aux (R) pots 25 turns CCW I was able to finally hear some music.  It is not very loud but it is there.  I worked on adjusting the EFIS levels.  I don't think I did a very good job.  On Monday when I am back out to the airport I will work on them again.  I entered the Audio Setup menu in SkyView and set the Volume Control / Test to 100%.  I turned on the radio and tuned to the AWOS frequency 134.425 and there it was.  Because the input from the MP3 player is fairly quiet I am not sure I was able to accomplish anything in the way of improving distortion.  I will work on that again on Monday.  I am happy that some of my electrical/audio problems are being corrected.  I still have a ways to go.  I took some photos of the switches showing what happens when they are activated.  For now the problem centers on the NAV/STROBE – NAV switch.   Again, when I turn on the NAV/STROBE switch the cockpit light and the AP disconnect light illuminate.  I also discovered that both the top and bottom green lights of the switch illuminate.  When I put the switch in the off position both lights go out but the top and bottom green lights in the switch continue to glow for 1-2 seconds.  When I turn on the NAV switch there is not cockpit light and no AP disconnect button light, but again, both the top and bottom green lights in the switch illuminate.  When turned off the continue to glow for 1-2 seconds.  
This is what happens with the NAV/STROBE switch activated.  Both green lights in the switch glow and the AP disconnect button (and the cockpit light) illuminates.
This is what happens when the NAV switch is activated.  Both green lights in the switch glow but the AP disconnect button (and the cockpit light) are dark.
This is what happens immediately after turn off the switch in either setting.  Both green lights in the switch glow for 1-2 seconds.  Gus at Van's thinks 2 of the pins in the option harness may be swapped.  He thinks pins 32 and 33 could be swapped.  I will send this new information to Van's and see if they can give me any more advice.  I may also send this to Stein Air and see if they have any suggestions as to what the problem is with the wiring.