Friday, August 31, 2012

Install Seat Harnesses and Upholstery

I decided to install the seat belts and upholstery.  I started by installing the pilot side seat belts.  It was fun to be working on the airplane again.  I have set a goal to be finished by the end of March 2013.  I installed the pilot side first.  
I installed the lap belt sections, then the crotch strap and then the shoulder harness.
I then began installing the upholstery.  I installed the pilot floor carpet and the forward side above the floor.  I then installed the pilot side panels.  It all fits very well.  I think it looks good.
Next I installed the same sections of upholstery on the co-pilot side.
There is a bit of fitting, tugging and tucking that needs to be done, but that can come later.  
I then put the upholstery on the rear baggage bulkhead and over the fuel tank and floor.  These sections are just laying in place until I install the floor cover plates.  At that point I can install the Velcro strips.  I will work on the floor cover plate installation and complete the upholstery next time.

Thursday, August 16, 2012

Wheel Pants

I started to work on the wheel pants.  I used a round sanding wheel on the angle grinder to sand the extra material from the inside surface of the front of the mail wheel pants.  I also marked the scribe line of the left wheel pant forward section with a blue Sharpie.  I put everything away and then for the next couple of weeks I was under the weather and was unable to work on the project.

Friday, August 10, 2012

Install Wing Rack and Other Changes

This afternoon, with the help of Cameron, my grandson, I made some changes in the garage to increase the work space and parking space.  We started by pushing the fuselage outside on the driveway.  We then put the right wing and stabilator on the lawn.  At this point we were able to get rid of some of the 'stuff' leaning against the garage wall behind that wing rack that was just taking up space.  I brought the Army trailer home and we started throwing in the items to be discarded.  Items such as large sheets of cardboard collected over the years.  Scraps of lumber and pieces of left over plywood.  All in all we were able to gain several inches of space.
We took the ladder off of the wall and rearranged the storage shelf and some of the other things stored against and on the wall.  
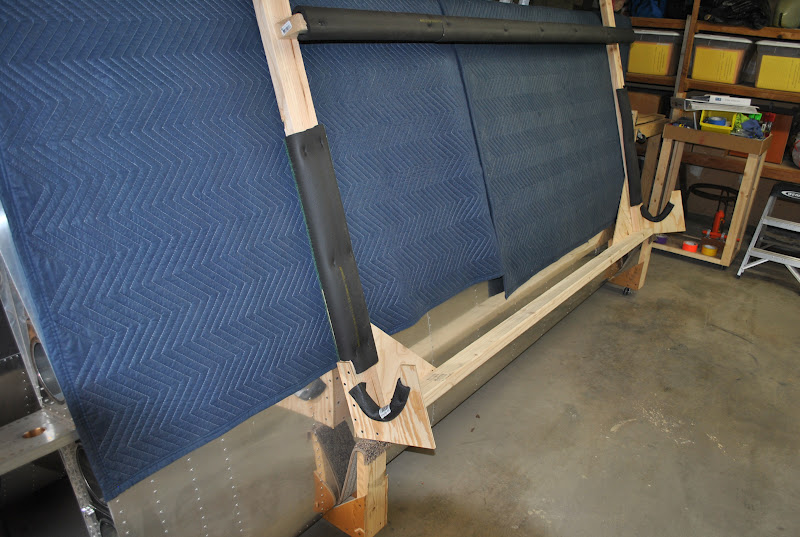
Next we hung the new wing rack on the wall.  I put some screw eyes in the ceiling and used some #10 wire to make some hook supports.  These hooks go into screw eyes installed on the wing rack.  When the rack was ready we put the wing in place and hooked it to the ceiling.  We also reattached the ladder rack to the wall and some hooks to hold the portable flag pole.  With a little more rearranging we were able to get some additional space.  
At that point we started the process of cutting down the rolling wing rack.  I started by having Cameron cut the carpet strips off of the back side of the wing rack.  I used a hand saw to cut down the back leg, through the gussets and through the bottom 2x4 on each end.  We then removed the caster from the lower leg that had been removed and reinstalled it so it is below the vertical 2x4 which used to be in the center of the rack.  We then put the stabilator on the rack and then put the single wing back in place.  
The rack now rolls up to the wall and we have saved close to 2' of space.  While we were working we constructed a new table to use as an engine work table.  
It is the bottom section of my old painting station.  I cut the lower legs from the paint station a couple of weeks ago with the intent of using them to make a rolling engine work table.  By using the fold up ends to my large work table that I removed a couple of months ago, I was able to put a top on the new engine work stand.  This will allow me to put the engine on a table and move it around as needed.  I plan to order the engine in a week or two.  In the mean time it will site in the garage under the tail cone.
With all of the changes made in the garage and the increased space (not really as much as I would have liked to gain) I will start working on the installation of the engine cowling and the wheel pants.  That will pretty much complete the work on the finishing kit and I will be ready to start working on the engine

Wednesday, August 8, 2012

Below Ceiling Wing Rack

I assembled a wing rack I will use to store the left wing below the garage ceiling.  By doing this I can modify my current wing rack and gain 2' of additional floor space in the garage.  I will screw the 2x4 support to the wall and fabricate some hooks to support the outer edge from the ceiling.

Tuesday, August 7, 2012

Jack Stand and Lifting Fixture

I decided I would like to be able to jack up a gear leg for future annual inspections, to work on the brakes and the wheels in general.  I am going to have to remove the wheels  when I start the installation of the wheel pants and that could start anytime now.  I have worked on the jack stand and lifting fixture for the past week, a little time spent over several days.  After thinking about this process for the last year of so, and observing what others have done, I decided to make my own lifting fixture.  It is pretty simple.  I asked a sheet metal contractor I use to help me.  I had him bend a piece of 10 ga steel into a 'U' shape.  I gave him the dimensions and he cut and bent the steel plate to my design.  I also had him bend an angle piece and weld it to the 'U' shaped piece.  I obtained a piece of uncured neoprene from a roofing contractor we use and adhered it  to the inside of the 'U' with Plibond.  The bracket is constructed so it is 3-5/16" at the top of the opening and 3-3/16" at the bottom.  I painted the fixture yellow.  After making sure it works properly I decided to adhere a piece of neoprene to the jacking surface so the jack will not slip.  Here are some pictures of the finished device.

I also decided to make a stand for the jack.  I am using a 4 Ton hydraulic bottle jack I purchased from Harbor Freight.  It should be plenty good enough to lift a landing gear on the RV-12.  It is a little short to reach the  lifting fixture so I made a stand for the jack to sit on.  The stand was made by screwing 2-sections of 4x4 together.  I attached a handle to one end of the double 4x4.  From Home Depot I purchased some broom holder clips and screwed them to the double 4x4s along one edge.  This will hold the jack handle.  I used fender washers and 1" long screws to hold the jack to the double 4x4s.  It turned out the way I thought it would and it should be functional.  Time will tell if I have a good jacking and lifting solution.  
I also added a rope handle to my wheel chokes.