Thursday, November 24, 2011

Finish Tank and Fuel Cap

This evening I unmasked the tank.  I did seal the top filler on the tank with blue tape to make sure nothing gets into it.
 
I also drilled the vents in the fuel cap.  Per in instructions in the plans I disabled the fuel cap and drilled the top of the cap.  From the many threads I have read on the RV-12 Forum concerning the Dynon 180 indicating a high fuel pressure reading I decided to do what many others have done.  Of course this is assuming the software in the Dynon Skyview will be similar to the 180.  Instead of waiting for the problem to manifest itself I have taken action right off the bat.  Instead of drilling a single vent hole in the fuel cap I drilled 3-holes.  I also drilled 3-holes on the inside of the cap.  I reassembled the cap and checked its function.  It appears to be working just fine.  I can always fill 1-or-2 of the holes with Pro-Seal if there is too much venting.

Tuesday, November 22, 2011

Paint Fuel Tank

 
This evening I painted the fuel tank and filler neck.  Using the same paint I have been using on the interior of the airplane I painted the surfaces that I primed last evening.

Monday, November 21, 2011

Prime Tank and Filler Neck


This evening I cleaned the exposed surfaces of the tank and filler neck with MEK.  I then applied primer to the tank and filler neck.  I can apply the finish the next time I have some time.

Saturday, November 19, 2011

SUCCESS!!!

 
This morning I ran one more pressure test on the fuel tank.  I pressurized the tank and then mixed up a soap solution and began testing all of the seams, joints connections and fasteners.  I worked in the shop and rolled the tank from side to side and top and bottom applying the solution to all of the edges and rivets.  I tested the sight window with all of the fasteners holding it in place.  I continued to test all of the surfaces and found no leaks.  I then tested the balloon attachment to the fuel strainer fitting.  No leak.  I tested the air hose connection to the fuel return line fitting.  No leak.  I then tested the air valve connection to the air hose. Voila!  As I put the soap solution on the end of the hose it began to blow a bubble.  I wiped it off and applied new soap.  A bubble immediately began to form.  I used a nut driver to tighten the fitting and the leak stopped.  The balloon has been inflated for several hours now and there is no sign of it going down.  HURRAY!   I will leave the balloon on for several more hours and we will see what happens.  I am sure it will remain inflated for several days now.  That was the only leak I found and it was slow enough to allow the balloon to remain inflated for long periods of time, but eventually the pressure decreased to the point that the balloon  deflated.  I am glad to have that problem behind me.  I am glad that it was not the actual tank that leaked.  
 
This evening after the balloon remained unchanged for several hours I decided to mask the fuel tank and filler tube so I can apply the primer and finish.  I masked both ends of the filler tube. I then masked the tank.    
 
 
The only portions of the tank that will be seen include the forward end, the fuel level sight window area and the area around the top flange and the rear attachment point.  I masked all but these areas so the tank is now ready to be wiped down with MEK and then primed and painted.

Friday, November 18, 2011

Fuel Tank Masking

I am going to paint the fuel tank surfaces that are exposed to view on the interior of the cockpit.  I see no reason to paint the entire tank if the bottom, back and side will not be seen after it is installed.  The trim package also covers the top of the tank except around the filler neck and the exposed right side except for the location of the site glass.  I am planning to mask the tank, leaving these areas exposed and then I will prime and apply finish paint.  I will also prime and paint the filler tube.   
When I got home last night I examined the fuel tank.  I discovered that the balloon was completely collapsed.  I guess because of the temperature in the shop there was a negative pressure in the tank.  I decided to run the pressure test once again.  I attached a balloon and pressurized the tank.  The balloon remained inflated until sometime during the night.  It was deflated the next morning.  The tank sides continued to show a slight bulge so I know the pressure in the tank was up, but the balloon was down.  I guess a soap test is still in order.
In preparation for priming and painting the tank surfaces I decided to work on the sight holes once more.  Using some Q-tips and a sharpened popsicle stick I worked on the sight holes again.  I cleaned out any remaining Pro-Seal with the popsicle stick and cleaned any sealant residue from the sight glass holes using MEK and a Q-tip.  I decided to start prepping the tank for finishing.  I will still need to do the soap/pressure test but I don't believe what I am doing tonight will interfere with the pressure test.  Next I used some blue masking tape to mask off the sight glass holes.  I put a strip of tape over the holes and depressed the tape into the recesses as best I could.    
Using an X-Acto knife I cut out circles over the sight glass and depressed the tape onto the sight glass.  I now have a series of blue dots covering the sight glass.  
I put some tape around the wire connection on the sending unit.  I also masked the connection and the coil of wire I installed as the ground for the sending unit.  My next step will be to run one last pressure test using soap bubbles and then I can mask then prime and finish the tank and filler tube.

Tuesday, November 15, 2011

Fuel Tank Pressure Test

 
This evening I started the pressure test of the fuel tank.  I attached the filler neck to the flange on the top of the tank and attached a balloon to the fuel strainer supply fitting.  I then began to pump the tank full of air using a bicycle pump.  I pumped and pumped the bicycle pump but the balloon would not inflate.  I removed the balloon, which was a long type balloon and installed a smaller balloon to the fitting.  
 
I began pumping again and then all of a sudden it was inflated.  I put some marks on the balloon with a blue Sharpie so I could monitor if it began to deflate.  I went upstairs and a couple of hours later came back down to the shop.  The balloon was a little bit smaller, but it was also colder in the shop so I took the tank upstairs into the living room.  
In the warmth of the living room the balloon expanded to the original size.  I continued to monitor the balloon.  It remained inflated at least until we went to bed.  In the morning the balloon was quite small.  I put the tank back in the shop when I left for work and re-inflated the balloon by pumping more air into the tank.  When I got home from work it was small again.  I put about 10" of water in the bath tub and began to submerge the sides and ends of the tank into the water.  I did not see and air bubbles which would indicate a leak.  When I pushed the bottom of the tank under water the pressure on the balloon became too great and it popped.  The air rushing out of the tank kept water from entering the fitting.   
I removed the tank, dried it off and installed a small orange balloon and started the air test again.  The results were the same.  The balloon remains inflated for several hours, but eventually goes down in size.  I will try a soap solution on all of the joints and fittings to see if I can get the tank to blow any bubbles.  I think it is air tight and the air is just escaping through the balloon.  We'll see after the soap test.
 

Friday, November 11, 2011

Prep Tank For Test

It has been 5 days since I did the final assembly of the fuel tank.  This evening I started to make preparations for the pressure test.  It is important that the tank be tested for leaks, however, the pressure applied to the tank must not exceed 1 psi.  That is pretty low, but that is what the instructions say and caution about over pressuring the tank.  If the pressure is too high the seams could be compromised and the tank will leak.  The test method is to install an air valve on the fuel return line and put a balloon on the fuel supply fitting.  After the filler neck is installed along with the fuel cap, the tank is pressured just enough to inflate the balloon.  The directions say the balloon will burst before any damage can be done to the tank seams.  Arlene is concerned about the tank being fully sealed so it does not leak.  I don't think I will tell her how low the pressure test will be.  She may be concerned that the pressure is insufficient to really be a rational test.  I trust that the engineers at Van's know full well what they are doing.  There are over 100 RV-12's flying and I have not heard of any problems with fuel tanks leaking after passing the test.  I have heard of some leaks appearing during the test, but never a problem after the test has been done to certify the tank does not leak.  
 
In preparation for the test I cut off a length of rubber hose and using 2-screw clamps I attached the air valve and the hose to the fuel return fitting on the bottom of the tank.  
 
I also put the rubber collar back on the tank filler tube.  Using the Dremel tool and a small sanding drum I removed some weld protrusions on the inside of the filler tube where it was welded on to the end flange.  The cap now fits nicely into the end of the filler tube.  By Monday evening I hope to be able to attach the filler tube to the tank flange, attach a balloon to the fuel supply and pressurize the tank.

Monday, November 7, 2011

Fuel Tank Final Assembly

 
This evening I finalized the assembly of the fuel tank.  What a messy and smelly project.  I am glad I will not need to mix up too much more Pro-Seal.  The stuff is messy, gets on and sticks to everything and really has an unpleasant odor.  I started by checking and prepping the mating surfaces of the tank lid, the tank top filler flange, the holes at the return line clip attachment points, the sending unit and the sending unit support ring.  I discovered I had not prepped the top of the edges of the tank lid.  Because I will be putting Pro-Seal under the rivet heads I determined I should prep the top of the lid so the Pro-Seal would adhere a little better.  I have been cautioned by my co-pilot that the fuel tank had better not leak!  After making sure all of the surfaces had been properly prepped, I wiped down all of the mating surfaces with MEK.   I set everything aside and proceeded to mix a batch of Pro-Seal.  I used the bottom portion a paper cup for mixing the stuff in.  I used the digital scale to portion out the sealant and the accelerator.  The Pro-Seal has a very distinct odor and it is strong.  I could have made this final assembly last Friday evening, but because he had our monthly family dinner and a temple preparation class at our home Sunday evening I didn't want the house to smell bad, as it does presently.  From past experience the smell will linger for days.
 
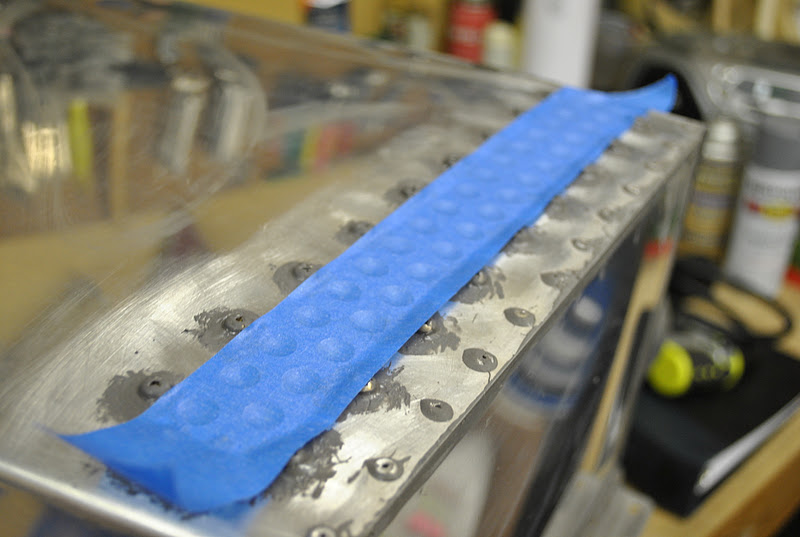
My first step was to attach the tank top filler flange to the top of the tank lid.  I then spread Pro-Seal on the top flange of the tank sides and placed and clecoed the lid on the tank.  The Pro-Seal is really messy and it was not really easy to get the first couple of clecoes in place, but after I got the lid aligned they went in fairly well.  I installed rivets on the forward edge of the tank lid and took a picture.  It didn't turn out too well.  I finished installing the rivets in the lid and took another picture.
 
You will notice from the picture that I installed the clips holding the fuel return line to the top of the tank with rivets.  The end of the fuel return line is now centered in the filler neck.   
 
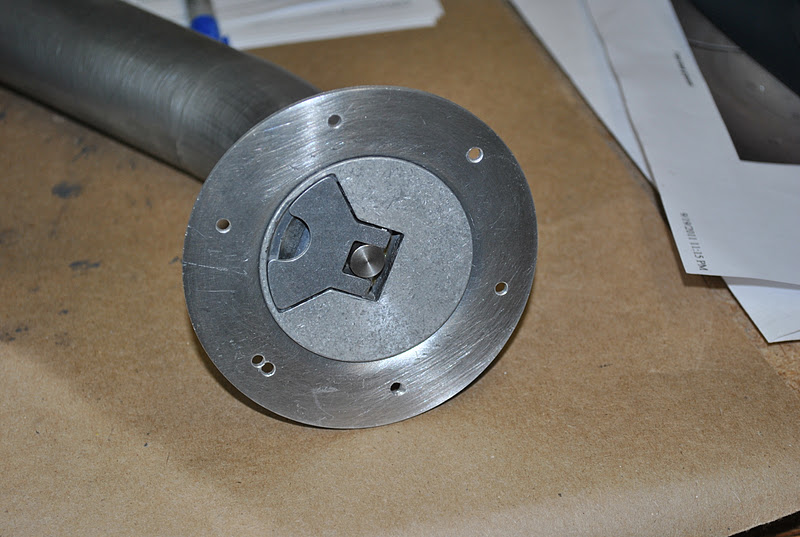
The next step was to attach the sending unit support ring and the sending unit to the front of the tank.  Before doing so I spread Pro-Seal in all of the upper corners of the tank to make sure they were all sealed.  Next I installed the sending unit to the support ring and then attached the support ring to the tank,  Following the advice of several RV-12 builders I attached a ground wire to the sending unit.  I put Pro-Seal under all of the screw heads attaching the ring and unit to the tank.  However I did not put any sealant under the head of the screw attaching the ground wire.  I put Pro-Seal in the nutplate and I hope that sealed the screw well enough.  I don't want to have a leak problem, but I also want to make sure I have a good ground for the sending unit or it will not work.  I now need to let the Pro-Seal cure for a week and then test the tank for leaks.  I am keeping my fingers crossed.

Friday, November 4, 2011

Fuel Tank Lid and Filler Flange

 
This evening I worked on the tank lid.  I marked and match drilled the holes in the filler flange into the tank lid.  I marked and cutout the inside hole in the tank lid where the filler flange will attach.  I deburred the holes in the tank lid and deburred the edges of the new opening in the tank lid.  I also used a Scotch Brite pad to prep all of edges of the tank lid on the top and the bottom so I can seal the lid to the tank.
 
 
The next step was to cut and bend the ¼" fuel return line.  I cut a piece of line and flared the end.  I used a fuel tubing fitting to attach the return line to the fitting in the bottom of the tank.  I used my tubing bender to bend the ¼" line so it was just under the lid.  It runs from the front of the tank to the center of the filler flange then turns up in the center of the flange.   I fabricated 2-clips to secure the fuel return line to the underside of the tank lid.

 
I clecoed the various parts together to make sure everything fits together properly.  Now I need to clean all of the surfaces with MEK, mix some Pro-Seal and attach the top to the tank, the filler flange to the top and the sender and support ring to the front of the tank.