

This afternoon I continued with the assembly of the fuel tank. I set up the work tables on the driveway and organized the tools, parts and supplies to continue work on the tank. I started by using the Dremel tool with a cut-off blade to cut off the stems of the blind rivets that did not break off properly. The Dremel tool made quick work of the project.


I then mixed about 1.5 oz of Pro-Seal. Using the digital scale it is pretty easy to get the proportions correct. After mixing the sealant I spread a thin layer on the side and bottom edges of the rear tank skin. I used clecoes to hold the top corners of the rear tank skin in place. I then installed rivets along the bottom and then the edges of the rear of the tank.


After riveting the bottom and sides of the rear tank skin I spread a thin layer of sealant on the aft tank mounting bracket and clecoed it in place. I used the specified blind rivets to attach the lower portion of the mounting bracket. I then put sealant over the holes and installed the 7-each aluminum rivets in the top of the aft mounting bracket. I used the rivet squeezer to set the aluminum rivets. Of course with the sealant it got pretty much all over the place. After squeezing the rivets I put sealant over the inside of the aluminum rivets and in the aft lower corners of the tank. I also applied some sealant on the exterior corners seams to make sure they are fuel tight. I drilled new #30 holes near the top of the 2-baffles and installed new blind rivets with washers as called out in the drawings. I missed doing this when I installed the baffles. I think they we be OK now.

I set the tank upside down on top of the fuselage so the sealant can cure.


I went into the shop and prepped the fuel sender attachment ring for installation on the forward end of the tank. I deburred the edges and countersunk the holes for nutplates. I then installed the nut plates.
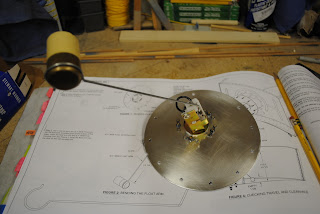


The final assembly today was the Res Sending Unit float and attachment to the fuel sender attachment ring. I used the bench vise to bend the float wire to the shape shown on the drawings. I then cut off the end, leaving ¾" as shown and snapped the wire in place on the sending unit. I then used the correct screws to attach the sending unit to the attachment ring. After the Pro-Seal cures for a couple of days I will attach the ring to the tank and make sure the float on the sending unit is adjusted properly.
