Tuesday, May 13, 2014

Canopy Seal, Wing Walk, CarbMate

I worked on a some different things at the hangar today.  I made several trips to Lowe's, the copy shop and other supply places.  I went to Lowe's and EVCO House of Hose to get some fittings to hook-up the CarbMate to balance the carburetors.   At Lowe's I was able to purchase some barbed fittings that go into the rubber hose which attaches to the CarbMate and which also fit into the rubber hose on the balance tube.  At EVCO House of Hose I purchased a barbed coupler for the 2-3' sections of rubber hose that came with the CarbMate plus a 6' piece of hose so I now have 2-6' pieces of hose hooked to the CarbMate.  Now I can easily put it in the cockpit when I adjust the carburetors. I disconnected the balance tube and installed the 1/2" hose on the elbow coming out of the intake manifold.  I also have a clamp to hold the fitting in the rubber side of the balance tube setup.  After checking to make sure everything fits properly I reattached the balance to so I can do my first engine run in a day or two.  
I finished the canopy seal kit by tightening the fasteners holding the rear canopy seal in place.  I then installed the 2-side pieces of seal just forward of the instrument panel.  I used Pliobond to glue these pieces of foam seal in place.  I cut them and trimmed them but I am not going to lower the canopy for a couple of days to let the adhesive cure.  
I put a  second coat of wing walk compound on the wings and steps.  I think the 2nd coat looks a lot better.  I think one more coat should complete the project.  I will get that coat on tomorrow.
Tom Gierhart and I have set a day and time for the inspection.  It will be Tuesday, May 20th at 10:00 am.  I also told Tom the FAA issued my registration with my name spelled Allen instead of Allan.  He called the FAA Registration office and they said it needs to be corrected.  They faxed a "fly wire", or 30 day temporary registration which must remain in the airplane until the office registration arrives.  I know the spelling mistake was a clerical error because I filled out the form and I think I know how to spell my name correctly.  I emailed John Albury about my trim setting.  I confirmed that it is correct at 1-7/8".  

Monday, May 12, 2014

Stabilator/AST Takeoff Setting, White Paint, Canopy install, Wing Walk Compound

Today I did several things.  I was at the hangar several times.  I started the day by adjusting the AST pushrod so the measurements between the AST and stabilator trailing edges are what they are supposed to be.  Now the takeoff trim setting is below the center line of the trim setting bar, but not at the bottom 3rd of the graph as others have theirs set.  I am going to send a picture of the measurement and the graph to John Albury and see what he thinks.
Dave finished touching up the red and white paint on Saturday.  It looks good and I am pleased with his work.  The scuffs that I did and the couple on the wings I think occurred during transit are gone.  The canopy arms are painted and the canopy is installed one again.  I still need to put the last couple of seal pieces behind the canopy arms and tighten the screws and nuts on the rear seal, but I can do that tomorrow.
I worked on a one page checklist.  I used the checklist I received from John Albury and printed saved a new checklist.  I will have it laminated and then it can go in the side pocket in the cockpit.  
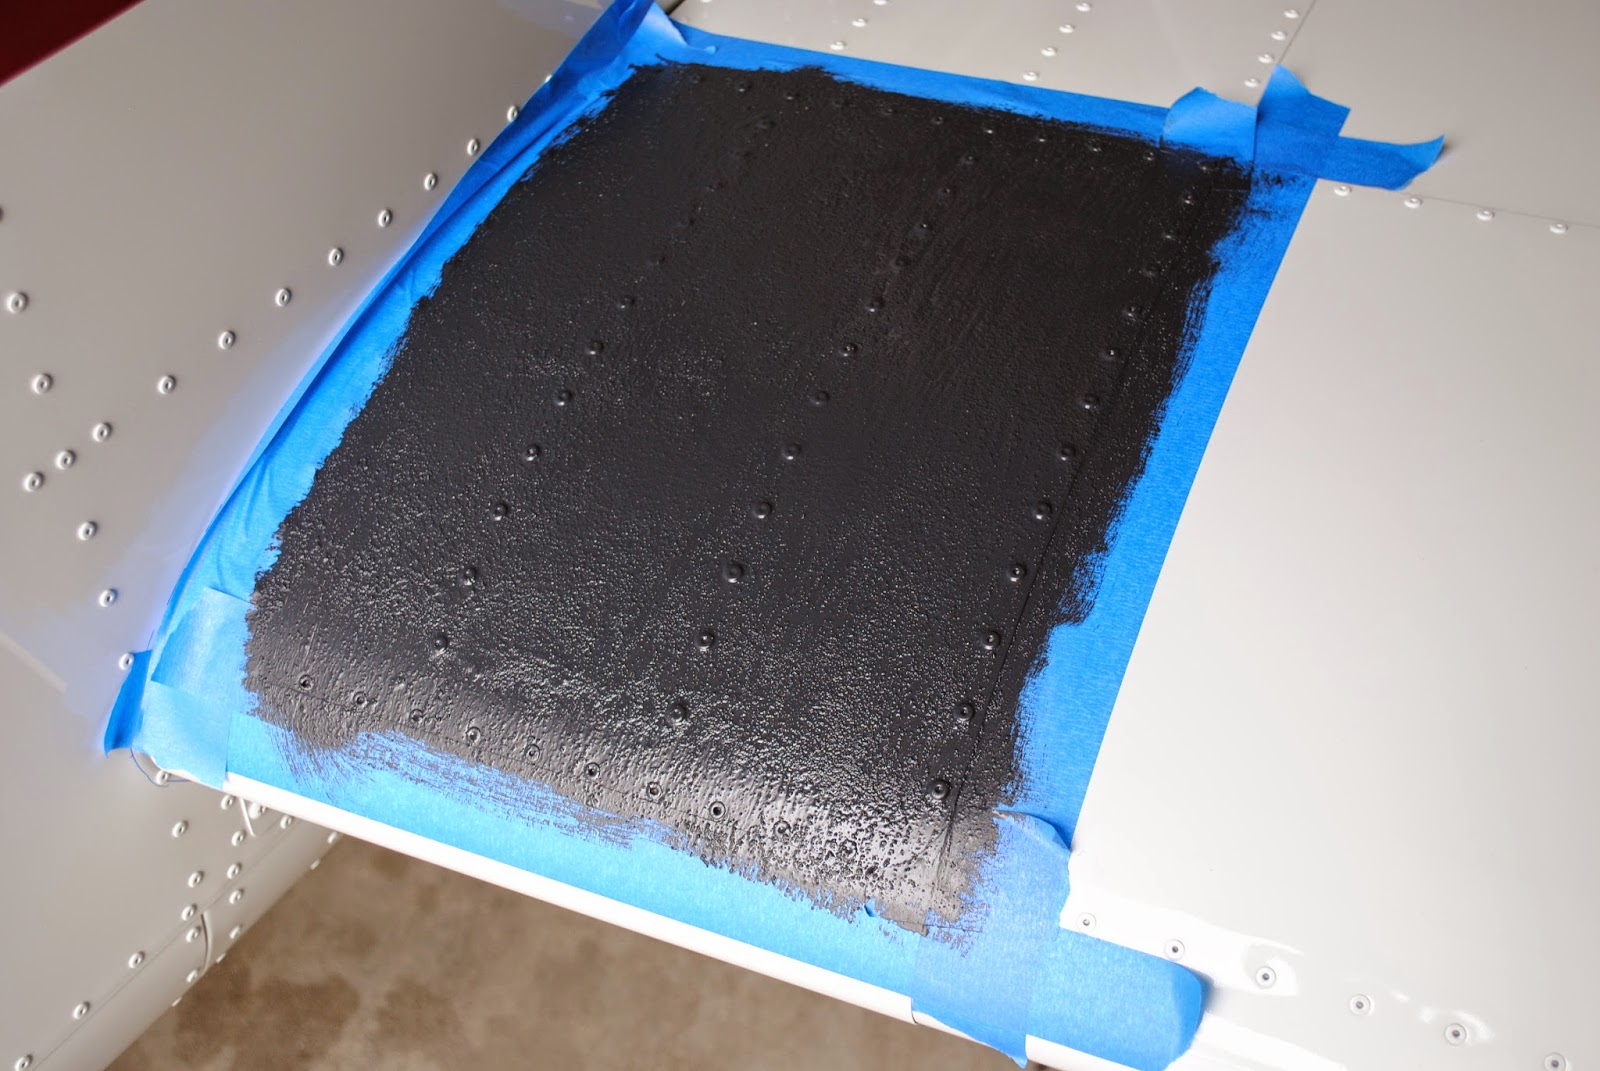
I decided this afternoon to start putting the wing walk compound on the wings and the steps.  I masked the wing area.  I used the wing walk material from Vans to get an idea of what area it should cover.  I used masking tape to lay it out.  I also taped off an area on each step for the compound.  The material I am using is some wing walk compound I purchased from Aircraft Spruce.  My understanding is it will hold up a lot better than the vinyl wing walk covering.  I shook the can of compound for a while then opened it up.  The stuff is really gritty.  Of course it is supposed to be.  I used a brush to apply the first layer.  It covered fairly well, but there are brush marks with the white showing through.  I am going to get a small roller and tray to put on the next several coats.
Though you can't see it in the painted picture, I rounded the corners of the wing walk area.  I also rounded the top of the compound on the step.  I hope this all turns out OK.  This afternoon I ordered some tubing plugs for the ends of the step tubes.  They should be here in a few days.  I also went by the Trophy Case to pick-up my data plate.  It is supposed to be on the airplane before the inspection.  They told me they would have it finished today.  When I was there they had not even started it and I was told the person who will do the engraving will not be in until tomorrow.  It is too bad when you must rely on other people.

Friday, May 9, 2014

Trim Setting, Canopy Seal, N-Number, PAP

Today I worked on the trim settings again.  I calibrated the trim setting again.  If I set the AST trailing edge at 1-7/8" above the stabilator trailing edge in the full-up position the green line on the trim tab readout is at the half-way point.
If I set the green line on the trim tab readout at a point 1/3 from the bottom the distance between the AST trailing edge and the stabilator trailing edge is 2-1/8".  I decided to work on the PAP.  I discovered that when the  stabilator trailing edge is full-up and the trim is set at full nose-up the distance between the AST trailing edge and the stabilator trailing edge is ¾" (normal distance: 9/16").  When the  stabilator trailing edge is full-down and the trim is set at full nose-down the distance between the AST trailing edge and the stabilator trailing edge is ½" (normal distance: 3/8").  I am going to try adjusting the AST pushrod so the distances are normal.  I will then recheck the trim setting and see where the green line is located with the 1-7/8" distance set on the AST/stabilator.  The PAP is complete with the exception of the engine and fuel.  I still need to put fuel in the tank and run the engine.  Hopefully I will be able to do both next week.  I am also hoping to have my certification inspection next week.  Tom Gierhart, the DAR is in Colorado this week.  He is planning to be back next week.  
I continued to work on the canopy seal.  I installed the seal on the side rails and on the forward portion of the canopy.  I will need to install the canopy to go any further.  I cannot install it until Dave has painted the ends of the canopy arms red.
I also marked the location of the wing seals on the fuselage with a blue marker.  I also looked at the instruction for installing the wing walk surfaces.  I decided to paint on some wing walk compound I purchased from Aircraft Spruce.  I will wait for the weather to moderate a little before I do so.  
I also installed the N-number on the vertical stab.  It looks like a real airplane.

Wednesday, May 7, 2014

Install Wings and Weigh Airplane

Today I went to the hangar and started putting things inside so I can do the weight and balance.  I put the seat supports and seat cushions in place.  I also put the upholstery in place in the airplane.  I put the RV-12 on the nose.  I think it looks good.  I also attached the final checklist and flight information placards I received from John Albury on the panel.
This afternoon I  checked the distances on the AST for the full up and full down trim conditions.  With the trim full up and the stick full forward the AST measures 11/16" from the center of the AST trailing edge to the center of the stabilator trailing edge.  In the full trim down with the stick full back the trim to stabilator measurement is ½".  
I also set the take-off trim condition at 1-7/8" up with the stick full back.  The green line on the trim setting on the Skyview is just below the ½ mark.  
It is supposed to be up 1/3 from the bottom.  If I set the green line at 1/3 up from the bottom the distance from the AST trailing edge and the stabilator trailing edge is only 1-5/8"  I will do some investigating  to see what this all means.  I am going to check the length of the AST pushrod and make sure the distance is correct.  If it is not that might be the reason the green line is so far up the scale.  I will remove the tail cone fairing and check the measurement.  
Tim came back to the hangar with me and we installed the wings.  We rolled the airplane outside and took some photos. 
We also rolled the airplane on some ramps and scales to get the weight for the weight and balance calculations. 
I also chalked a line along the leading edge of the wing using a plumb bob to locate the line on the hangar floor. I used  a framing square to locate the center of the axle bolts and measured to the line from the nose wheel and from the main gear.  I can now complete the Weight & Balance Work Sheet for PAP.  

Tuesday, May 6, 2014

Reassembly Continues

The first thing I did today was remove the upper tail cone fairing.  I realized last night that I did not torque the 2-AN4 bolts holding the stabilator in place.  I torqued them this morning then reinstalled the upper tail cone fairing.   
Next I then installed the upper fuselage skin.  I neglected to take photos, but after the upper fuselage skin I installed the canopy, engine cowlings and spinner.  
At that point I rolled the fuselage outside and took a couple of photos.  The wind was blowing and it deflected the rudder as you can see in the straight on shot.
I pushed the airplane back into the hangar only to discover I was too close to the wing.  In my efforts to move it over I scratched the top of the wing with the stabilator.  My first hangar rash. 
That only goes along with some other damaged paint from the reassembly process.  There is a spot just behind the engine cowl by the exhaust pipe.  There is a spot under the leading edge of the left flaperon.  I have certainly caused some problems putting this thing back together. 
There is also a need to do some painting on the upper fuselage skin.  After the reassembly I have decided to do the stripe at the canopy arms a little differently than originally planned.  I was going to have Dave paint some white in the recessed area at the canopy arm attachment point.  I've decided not to do that.  I will just have him paint the strip across the lower fuselage skin and let it go at that.  I am happy with the way that area has turned out.
The forward ends of the canopy arms also need to be repainted with red paint.  Dave is going to do this when he paints and touches up the white.  I removed the canopy so he can get to the forward sections of the arms.
I also started working on installing the canopy seal kit.  
I labeled them and notched the slots in the seal retainer strips and deburred and cleaned them with a Scotch Brite pad. 
I took them home, primed them and put on a coat of interior paint.  They will be ready for installation tomorrow.