Tuesday, October 2, 2012

Nose Wheel Pants

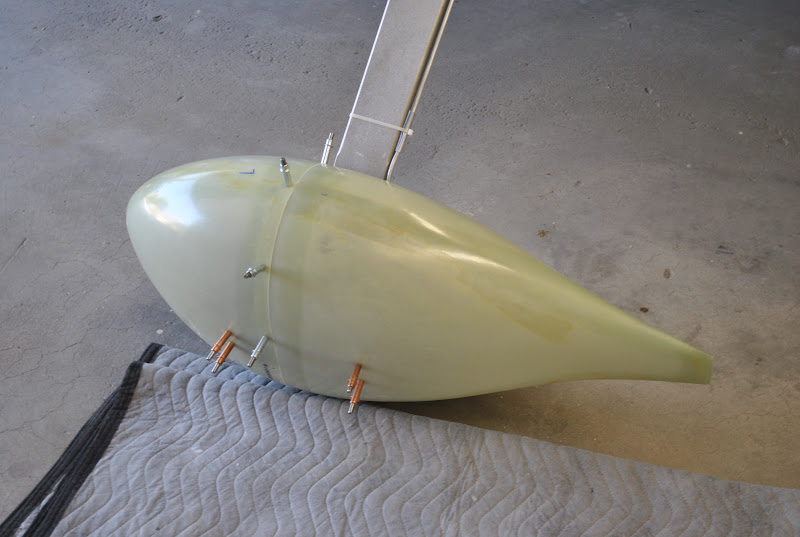
This afternoon I started to work on the nose wheel pants.  I set up my work area in the garage and started by trimming the fiberglass parts to 1/16" from the scribe lines with my Dremel tool.  I used my angle grinder with a 2" sanding disk and a 1-½" sanding drum to remove the fiberglass closer to the scribe lines.  I finished with a sanding block.
I tapped the fore and aft sections together.  They seemed to fit pretty well.  I drilled the ¾" hole in the forward half with the unibit.  I then used a round file to open the hole to the 13/16" diameter hole asked for in the drawings.  I drilled the holes in the fore and aft halves according to the drawings.
Next I shaped and clecoed the splice plates in place on the forward half.  I clecoed the aft half to the splice plates from inside of the pants.  The fore and aft sections seem to fit together very well.  I must admit I had to do quite a bit of marking and sanding to get them to fit together this well.
Using MEK I cleaned off all of the marker and set the fairings aside for the night.

Monday, October 1, 2012

Wheel Pants and Fairings

After repairing the epoxy/glass bead mixture and attachment of the wheel pants to the mounting brackets I continued with the final installation and completion of the pants.  I started with the left wheel pants.  I clecoed the #40 holes around the splice of the fore and aft halves of the pants.  I drilled #27 holes in the 3-locations called out on the drawings.  I removed the pants and installed nutplates on the after half at the 3-previously drill locations.  To work on the pants I set up 2-tables in the garage.
Using the rose cutter I recessed the #40 nutplate holes for the flush rivets.  I used my microstop to countersink the holes in the forward half for the #6 mounting screws.  I reassembled the pants and  drilled the remaining 6-holes.  Following the same procedure I installed nutplates at these holes and countersunk the corresponding holes in the forward half.  I then reinstalled the left wheel pant on the left main gear.  Next I installed the PVC fairing I purchased at the base of the gear leg where it enters the wheel pants.  I drilled holes and installed nutplates on the pants.  The fairing will be held in place with 3-#6 pan head screws.
I then repeated the process to install the right main gear pants and fairing.  I disassembled both fairings and pants and put them away for now.  Next I will begin to install the nose wheel pants and gear leg fairing.  I have decided to install the main gear leg fairings at the fuselage with pulled rivets after the certification inspection

Friday, September 28, 2012

Wheel Pants & Fairings

I removed the wheel pants after installing them with and epoxy/glass beads paste.  The mixture did not do so well during the installation of the pants.  There was little epoxy around the mounting brackets to hole the pants stationary.  I surmised it was because I didn't put enough of the epoxy mixture around the screw holes and because in mounting the halves I smeared the material out of place.  I mixed new epoxy/glass beads and reinstalled them on the brackets.  This time I put additional material in the appropriate places and the seem to be fine.

Thursday, September 27, 2012

Wheel Pants

I did the final fitting and installation of the mail wheel pants.   I worked on the right pants and fitted them to the right main gear.  I needed to do some additional trimming of the cut out for the gear leg and brake line.  I was able to get them to fit properly.  I then turned my attention to the tire opening at the bottom of the pants.  As indicated in the drawings, I needed to open the outboard portion of the tire opening.  I used a Sharpie to make the bottom of the pants and then used the Dremel tool to cut out the excess materials.  I then used a sanding drum on my angle grinder to round the corners.  I also marked the leading and trailing edges of the tire openings using a detergent bucket for the shape.  I used the sanding drum to round the openings.
I used a piece of 80 grit sand paper to rough the inside of the bracket attachment holes after final drilling them.  After cutting and trimming the wheel pants I used a blow gun to blow off the dust.  I used some MEK to clean the blue Sharpie ink off of the pants.  I also cleaned the sanded areas around the bracket mounting holes.  
I used a candle to apply wax to the mounting screws.  This is to prevent the epoxy mixture from adhering to the screws.  I mixed some epoxy resin and added some glass beads.  As instructed I mixed it to the consistency of peanut butter.  I then spread the mixture around the bracket mounting holes on the inside surface of the wheel pants.  I put some blue making tape on the surface of the mounting brackets on each wheel.   Starting with the right gear and wheel I installed the pants, securing them to the brackets with #8 screws.  The went together without any problems and the pants seemed to fit properly.  The epoxy mixture was squeezed around the ends of the mounting brackets.
The parts fit together very well.  Tomorrow I will remove the pants and tape and see how the epoxy turned out.  Next I will install the nutplates to attach the for and aft halves of the pants together.

Wednesday, September 19, 2012

Center Panel, Swap Pins and Start Pants Install

Today I worked on some miscellaneous things.  I final glued the carbon vinyl wrap to the bottom edge of the center panel.  It has come loose.  
I then reinstalled the center panel.  It looks acceptable to me this time.
I also swapped the pins in the "Optional" D-sub connector where it attaches to the control module.  Using the proper tool I removed pins 3 & 4 and reinserted them in reverse order.  This is due to a software change in the  4.0 firmware of the Skyview download.  I have yet to download and install the software, but I decided to swap the pins now.
I then turned my attention to the left main gear fairing.  I clecoed the aft portion of the fairing in place.  It seemed to be too tight around the gear leg.  I checked my measurements and somehow I did not remove enough material. 
 I removed some additional material to the rear and top of the opening.  I reattached it to the bracket and it fits well.  I also needed to remove a small amount of material from the forward fairing to make it fit properly.