Friday, March 23, 2012

Fiberglass Canopy Shroud

 I took off early today so I could work on the canopy fiberglass.  The temperature today is 70+ degrees.  It is a great day to fiberglass.  I pushed the fuselage to the center of the garage and pushed the tail out the garage door.  I sanded the canopy and canopy skirt where the fiberglass will be applied.
 I put Mylar packing tape over the duct tape and then rubbed a thin coat of wax over the Mylar tape.  I used some old mat board to make some flat pieces to support the fiberglass below the canopy support arms.
  I set up the small work tables and cut the side pieces and the long strips of fiberglass cloth that will go on top of the upper fuselage.  There are 10-side pieces (5-left side and 5-right side) of fiberglass.  There are 10-long narrow pieces to be installed on the top of the upper fuselage.  I was able to tape the fiberglass down to the cutting board and using the rotary cutter, prepare the strips for installation.
 I preceded to mix the fiberglass resin and add colorant.  I am coloring the resin black so when it is viewed through the canopy it will be black.  Following the instructions I brushed a coat of the mixed resin on the foam block, canopy Plexiglas and aluminum skirt on the right side of the fuselage.  I carefully wetted out the first layer of fiberglass cloth by placing the cloth between 2-sheets of 4 mil plastic sheeting.  Using a small brush I put resin on the cloth, then using a squeegee I spread the resin through the cloth.  It worked really well.  I then removed the upper layer of plastic and placed the layup on the fuselage.  With a little minor adjusting I was able to move and slide the piece of fiberglass cloth into place.  I then preceded to do the same thing on the left side.
After the fiberglass was laid-up on the sides and the top I laid-up a layer of peel-ply over the whole shroud.  After working on the project for 6-½ hours I cleaned up the messes, put the airplane and fiberglass supplies away and let the whole thing cure.

Monday, March 19, 2012

Shape Canopy Foam Blocks

 
This evening I glued a piece of 80 grit sand paper to an 18" long piece of 1x4 and sanded the foam canopy blocks.  By using a piece of 1x4 it is easier to shape the blocks to the profile of the fuselage.
 
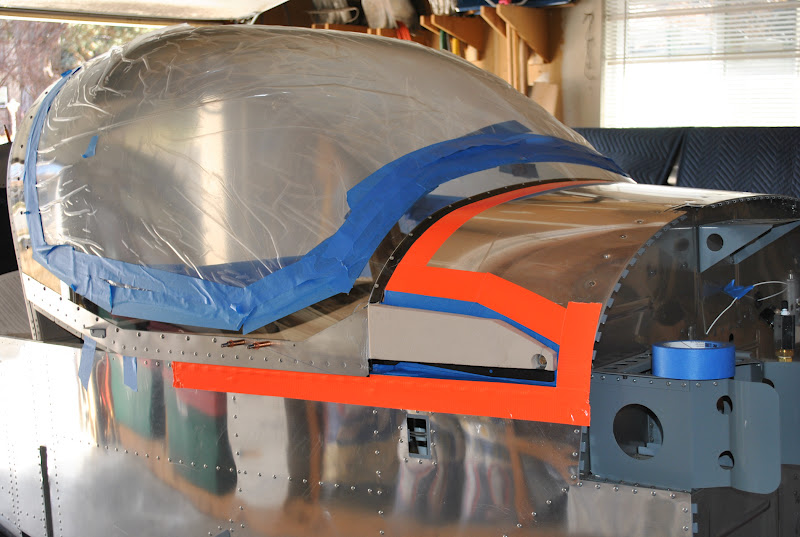
I wiped and vacuumed the dust from the fuselage and surrounding areas.  Next I taped the right fuselage masking guide in place and put a layer of red electrical tape on the canopy and fuselage skirt.  I then moved to the left side and repeated the process.
 
I then put red electrical tape over the forward canopy to connect the 2-sides together.  Next I put masking on the canopy over the red electrical tape.  I will need to mask the fuselage sides and rough up the Plexiglas canopy and aluminum skirt.  I will then be ready to start the fiberglass.  I hope to be able to put the fiberglass on the support arms by Friday.

Saturday, March 10, 2012

Canopy Continues

 
This afternoon I discovered some additional unexpected fiberglass resin problems.  Before the resin was set up it did an little running.  Some resin seeped out of the slots in the support arms and puddled around the pads on the clamps.  When I removed the clamps I found some smears of hardened resin and a slight run.  I decided to sand the inside of the support arms and recoat them with black Hammertone. 
 
I carefully masked off the areas surrounding the arms.  
 
Next I sprayed them with the black Hammer-tone paint.  They look pretty good again.
 
After the paint dried I masked the inside of the support arms and then had Arlene help me set the canopy in place on the fuselage.  I also found a small drip (run) of resin on the corner of the canopy bow on the left side next to the plexiglass canopy.  There is another blob and run of resin on the rear canopy frame.  I will address these at a later date.
 
 
I took some shots of the inside.  All you can see is the masking of the fuselage and instrument panel but at least is shows some progress.
 
I also took a couple of pictures of the fuselage with the canopy back in place.  I am getting excited again about moving the build forward.  The weather has been steadily improving.  Right now it is 61 degrees.  If this keeps up I will be able to put the fiberglass surround on the canopy when we get back from Gilbert.  We are flying Southwest to Gilbert tomorrow.  We will be there until next Saturday.  I attended the EAA Chapter 23 meeting Friday night and had a chance to speak with Tom Driscoll.  Tom is building an RV-12 also.  From the sound of things we are pretty much at the same point in the build.  We have both ordered the Avionics kit and are waiting for the kits to be shipped.  I will need to go out to his place sometime and see what he has accomplished.

Wednesday, March 7, 2012

Epoxy Foam Blocks to Support Arms

 
This evening I attached the foam blocks to the canopy support arms.  I scuffed the aluminum support arms with 100 grit sand paper.  I then mixed some epoxy resin.  I added some flox to the resin.  The instructions say to add enough flox so the resin will not pour when the cup is tipped.  After preparing the resin/flox mixture I spread it on the back and bottom edge of the foam blocks.  I then slid the blocks into place on the support arms and clamped them.
 
Unfortunately, during the process I broke off the small end of the right block at the hole.  I put some resin/flox on the joint and pressed it in place.  I think it will be just fine.  After curing overnight I removed the clamps.  The blocks appear to be attached just fine.  Even the small broken piece seems to be attached very well.

Tuesday, March 6, 2012

Continue to Mask Fuselage and Canopy


Over the last couple of days I have been working on masking the fuselage and canopy in preparation for starting the fiberglass.  I used some orange Duck Tape on the fuselage.  I put 3-layers of tape along the lower fuselage skin.  I put 1-layer of tape over the upper fuselage skin all as instructed on the drawings.
 
Next I set up my small work tables and brought out the canopy.  I placed the canopy on the tables and started to prep the support arms to received the foam blocks that will be epoxied in place on each arm.
 
In the shop I marked each foam block and then used a hack-saw blade to cut the wedge off of the end of each block.  It is necessary to cut the wedge off of the block so it will fit on the support arms.  The support arms have an angled bend in the to follow the support on the fuselage.  It was fairly easy to cut the foam with the hack-saw blade.
 
After cutting the wedge from the end of the foam blocks I placed them on the support arms and marked the outline of the support arm on each block.  I also marked the location of the hole for the support arm bolt.  Using a 7/8" hole saw I drilled each block for the support arm bolt.  After cutting the blocks to shape I taped them to the canopy support arms.
 
I sanded the support arms to prep the aluminum to receive the epoxy.  It then occurred to me that when the canopy is raised the lower part of the support arm will be exposed to view.  I had painted the upper portion of the support arms previously, but it did not occur to me at the time that the whole support arm would be visible.  I decided to paint the lower portion before I epoxy the foam blocks in place.  I taped and masked the support arms and after coaxing my can of Rustoleum Black Hammertone spray paint to work, I applied the paint.